 Blogging and photography go hand in hand, rather like peas and carrots as Forrest Gump would say. I’ve been into photography since I was a teenager and did it at college in my twenties. My blog www.larderlove.com started just as a chatty blog back in 2008. A place where I just jotted down everyday events and put a photo up there just to record an event or nothing much at all really. It wasn’t till 2019 that I started putting up recipes regularly and photographing food.
LEARNING
I love photography and I love photographing food. It is an art form all of its own. I was well and truly bitten by the bug and bought all the books I could on the subject and did online courses. I also went on a food blogging course which covered photography and writing in Ireland with Plate To Page. That was amazing and really improved my images a hundred fold and a I made some great friend too. I’d highly recommend going on a course where you can learn hands-on with expert tuition.
Having said that you will constantly be learning. Every time you take another photo you’ll learn something else. Follow the big food bloggers whose images you admire and learn from them. Take notes and ask people questions.
CAMERA & KIT
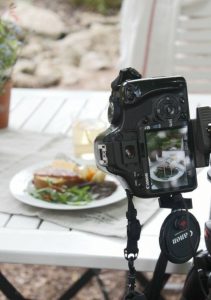
Nowadays I use a Nikon D7000 camera but started off my food blogging with my trusty old Canon Rebel that I’d been using for years while photographing model horses. A DSLR is the best for photographing food and as for lens choice I use a 50mm prime lens most of the time and a macro lens sometimes too.
A tripod is essential for keeping things stable and avoiding the dreaded blur of camera shake. Using a tripod also means that you can set up the food, set up the camera on it’s tripod and then nip back to the food to tweak things and know the camera is all set up and ready for action.
GO MANUAL
Forget shooting in AUTO mode, switch to MANUAL and learn how to get the most out of your camera. Play with the settings, get used to it, make friends with it and take lots and lots of photographs to learn what you actually want to achieve.
LOCATION, LOCATION, LOCATION
No, I don’t mean Kirstie Allsopp and the TV programme of that name. I’m talking about your location for taking food photos, or more importantly the location of the LIGHT.
Light to photography is what paint is to an artist. It is the catalyst, the tool, the all-important ingredient that makes things work.
For my photos I like to have light coming from what I call high side. That means if you imagine a clock face and the food you are photographing is in the centre I like to have my light coming from either 10 o’clock or 2 o’clock. You don’t want the light coming from in front of the food (6 o’clock) as this is way too harsh and if it comes directly from behind at 12 o’clock it will be great for some things (like soup in a bowl or low flat objects) as it gives a shine and highlights but you will lose that depth and shadows.
Use something in place of the food you are going to photograph to get an idea of where the light is goiung to hit it and see where the shadows fall. This way you can move things around till you get it right before you actually place the food in the shot.
Bright sunlight is too harsh and blows out your images, soft light is always best and go for natural light and never flash for food if you can possibly avoid it.
TIMING
Take your time to set things up beforehand, get your lighting sorted out as to where you are shooting and have all your props etc in place. This is especially important if you are shooting something that is going to loose its looks quickly (like a souffle) or something like hot coffee where you want to see steam coming off that cup.
PROPS
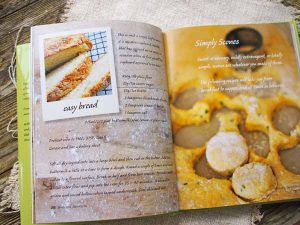
I scour flea markets, charity shops and the like for old bits and pieces for food photography. When I was writing my Scottish baking book I amassed loads of old tea cups and pretty plates to show off the baked goodies. For my Scottish party food book I was buying up tiny glasses, little dishes, party forks and the like. Keep your eyes open all the time for things that could possibly be useful in photos.
Plates are best if they aren’t heavily patterned, remember the food is the star of the photograph, you are not advertising the plate.
Backgrounds are important too, what you actually have the food on. Go for a variety of table tops and cloths etc so your images aren’t always the same. You can actually take photographs of interesting old doors and pieces of wood and have these blown up to poster size and use these to set your food and props on. It is all about illusion.
Old things with patina add character to photographs whereas bright white dishes give a bright clear simple look. It all depends what you are photographing and the sort of look you want to go for. Bright, modern, sunny or a bit moody and dark.
EDITING
I use Lightroom to import my photos into my computer and do initial editing then Photoshop Elements to tweak anything afterwords. There are lots of different photography software packages available but I’d definitely recommend Lightroom first and foremost.
Even though you can do a lot with software do try to do as much as possible with the camera itself. Take the very best shot you can, and lots of them at different settings and then you can pick the best when you upload them into your computer. Again it is all a matter of trial and err
When you are happy with your photos you are all set to use them for your blog or if using for print publication make sure you have them saved at 300dpi.
Enjoy getting snap happy!
 Writing a cookbook is fun and fattening! I say this from experience. My Scottish baking book (
 WHEN IT’S OUT THERE